Configuration Editor
The Configuration Editor lets you interactively configure the CC4M's checks such that they reflect your coding guidelines. You can also clone one of the predefined configurations and modify it to your liking.
Opening the Configuration Editor
The Configuration Editor can be opened in multiple ways:
-
From the GUI using the Open button on the Configuration tab.
-
By calling
monkeyproof.cc4m.openConfigurationFile(configFile);whereconfigFileis an optional input: the configuration file to edit and activate. If left out, the currently active configuration file is opened. -
By clicking one of the links in a CC4M report:
-
In the Metadata section, the Open button next to the configuration file path.
-
At a check's information, the Open check configuration link. If the check is not yet configured, you will be prompted to add it to your configuration file so that you can edit it.
-
In the parameter information table of a check, the Open link. If the parameter is not yet configured, you will be prompted to add it to your configuration file so that it can be edited.
-
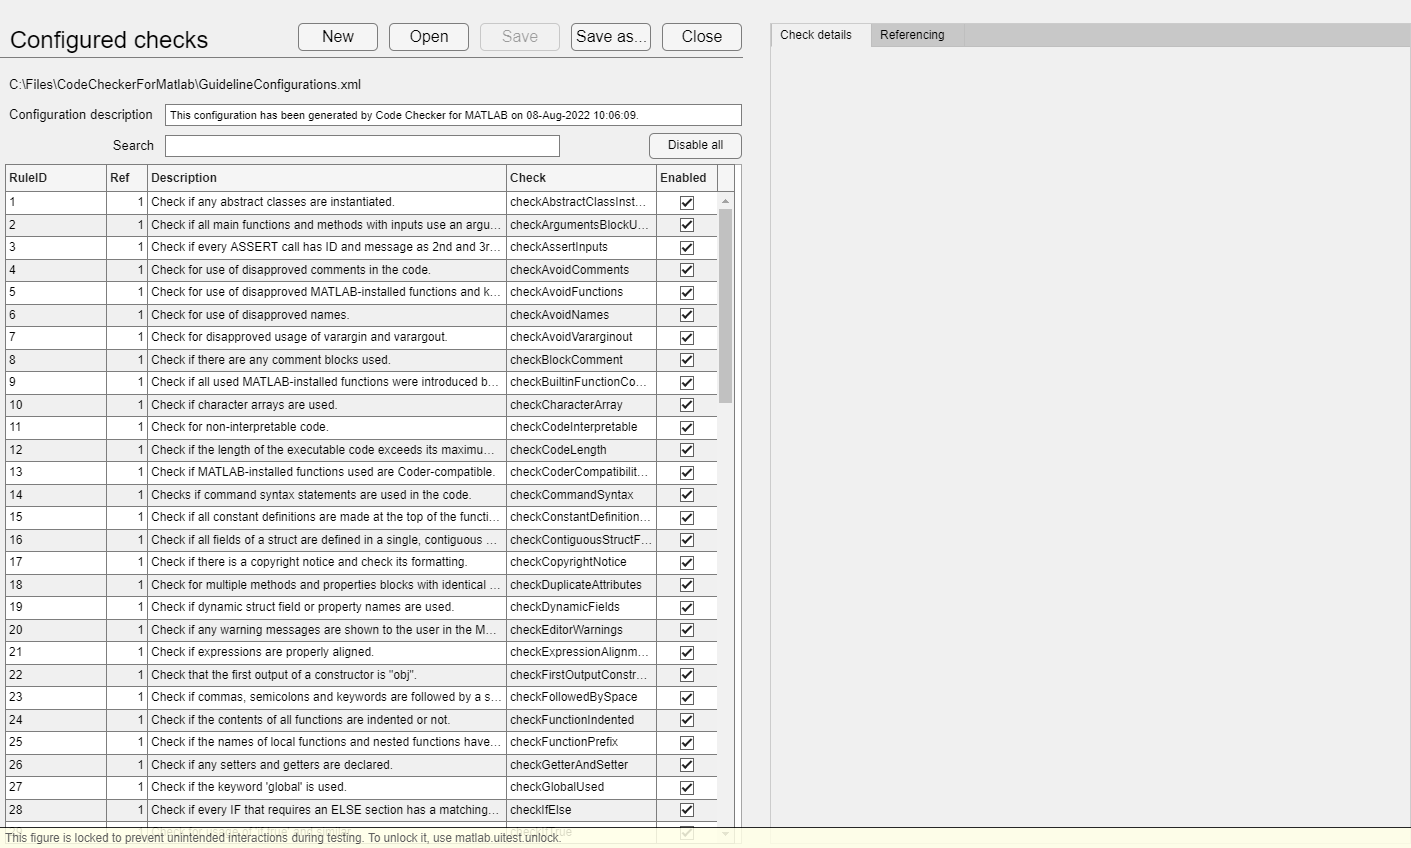
As the Configuration Editor opens, the active configuration file is validated against a Schema file. If it succeeds, you will see an interface as shown in the figure below.
If the Schema validation fails, the configuration file can not be loaded and you will have to either open another configuration file, or edit the current configuration file in a text editor and try to open it in the Configuration Editor again.
After successfully opening your file, you will see the following things:
- The full path ot the selected configuration file (or just the name in case of a predefined configuration).
- The editable description of the configuration file.
- A list of CC4M checks and reports with for each check/report the
following information:
- Rule identifier
- Reference number
- Description
- Name
- Enabled checkbox
If you already have an opened Configuration Editor in the current MATLAB session, the actions listed above will simply bring the window forward.
Note: In MATLAB R2017b, minimized Configuration Editor windows will remain minimized when one of these actions are performed. Resizing the application may not work properly for MATLAB R2017b. Maximizing the window makes sure all controls are at least accessible.
Editing the configuration of a check
You can enable or disable checks by checking or unchecking the checkbox on their respective rows. You can also enable or disable all checks at once using the Enable all/none button right above the Enabled column. Clicking a check's name or description will display its configurations on the right, like shown in the figure below. You can now see and/or edit the following:
-
The Clone button clones the check configuration and adds it the list. This allows using the same check with multiple parameter configurations.
-
The Remove button removes the check configuration from the list.
-
The Override button allows to override referenced check configurations. Since referenced check configurations cannot be edited, this allows enabling/disabling of the referenced check and modifying its parameters.
-
The check's Description. This will also be displayed in CC4M reports.
-
The Source of the check can be a reference configuration or the current configuration.
-
Enable checkbox.
-
The Priority of the check. Options are Recommended, Strongly recommended, and Mandatory.
-
The Severity level of the check, can be in the range from 1 to 10. Level 1 indicates issues of critical importance and the severity decreases with each level. The severity levels are derived from the following webpage.
- 1 - Certainly a programming error
- 2 - Very likely a programming error
- 3 - Programming pitfall/undesired programming construct/accident waiting to happen
- 4 - Design issue with high impact on reliability or maintainability'
- 5 - Design issue with low impact on reliability or maintainability
- 6 - Portability or performance issue or high impact other issue
- 7 - Comment related issue or medium impact other issue
- 8 - Naming convention or low impact other issue
- 9 - Style related issue
- 10 - Controversial issue or issue with a relatively high false positive rate
-
Categories of the check. Use this to tie the checks to groups of coding standards. The value shall be a semicolon-separated list of categories.
-
A Rule link for linking the check to a guideline. The link should be a valid URL starting with
https://orhttp://.- The Go to button that goes to where the rule link is pointing, if the rule link field is empty, this button is disabled.
-
The Rule ID.
-
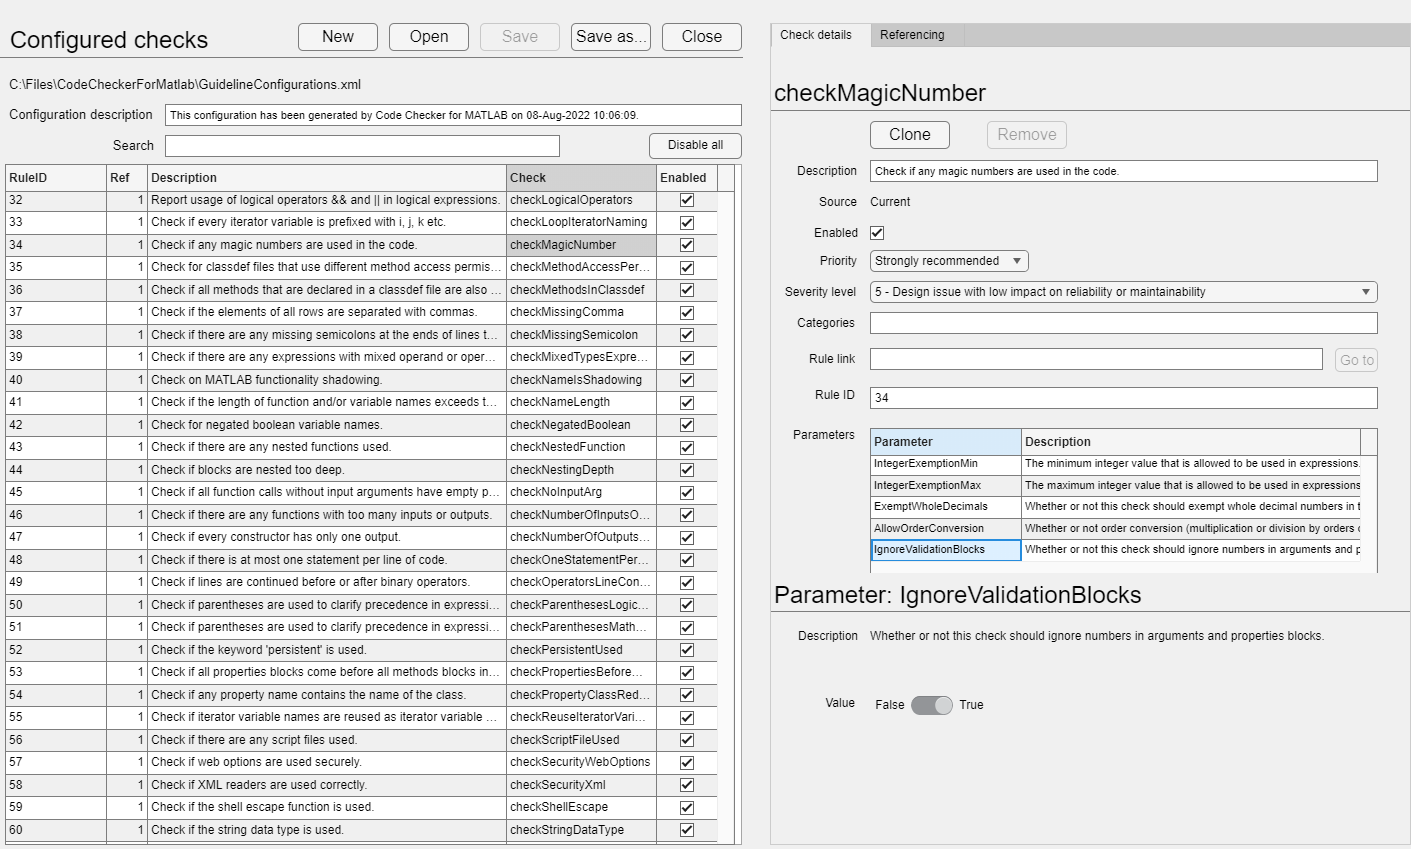
If the check has configurable Parameters, their names and descriptions are shown. By default, the first parameter in the table is selected and its details are shown below the table.
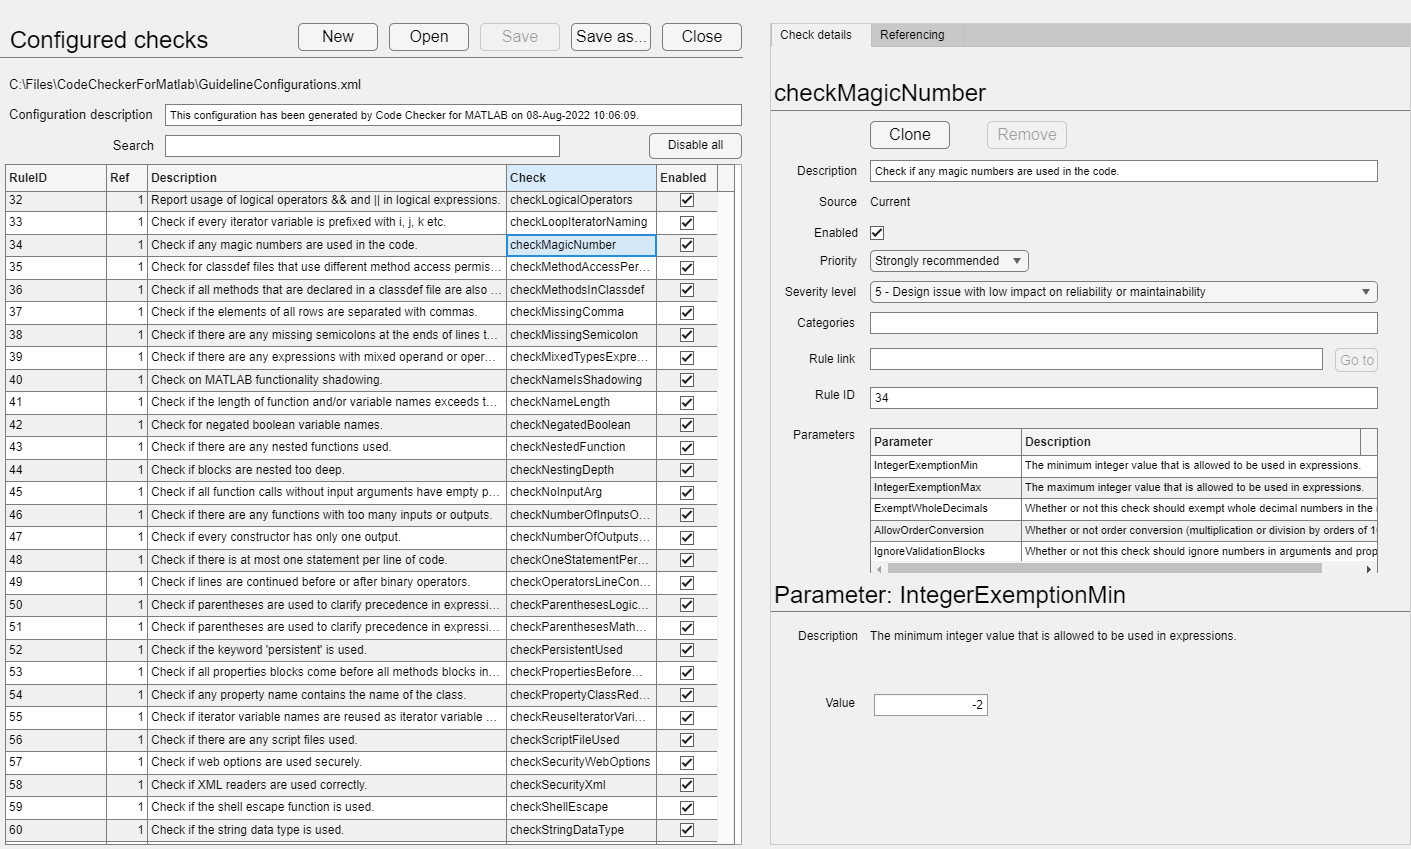
Selecting a parameter will show the parameter description and its value(s). By default, the first parameter of a check is selected (if there are any) when the check is selected in the checks table. Depending on the data type of the parameter, different components are used to edit the parameter value:
-
For boolean parameters, a switch to choose between True and False is shown. This is also shown in the figure below.
-
For parameters of type double, a numeric text field is shown that applies the minimum and maximum values of the parameter.
-
If parameters of type string have any allowed values, a dropdown menu is shown that lets you select one value.
-
Parameters of type string that have no allowed values, a textbox is shown that lets you type the parameter value.
-
For parameters of type list, a dropdown menu is shown if there are allowed values. Depending on the parameter, one or more parameter values can be selected.
-
If there are no allowed values, parameter values of type list can be typed in a text box using one value per line.
Selecting a different check or parameter after editing one will store any edited values so these will not be lost. Clicking Save or Save as... lets you save the configuration file such that the updated configuration file can be used for checking your code. Please note that the configuration file is generated using the global description and the checks and parameters as they are in the Configuration Editor. This means that if your configuration file contained comments or empty lines before, they will no longer be there. If you are editing a predefined configurations file shipped with CC4M (see section Predefined Configurations), the Save button will be disabled because it is not allowed to save configuration files in the folder for predefined configurations. You will have to save the file in a different location.
Note: Creating, opening or saving a configuration, selects it as the active configuration in CC4M.
Find checks efficiently
With the large amount of checks CC4M provides, it may be difficult to find what you are looking for. For this reason, you can use the search bar above the table of check configurations to filter the rows in the table. When searching, keep the following in mind:
-
Separate multiple search terms using spaces.
-
A check configuration is found if at least one of the search terms is found in (part of):
- The rule identifier (column 1 in the table)
- The rule description (column 3 in the table)
- The check's name (column 4 in the table)
- The categories of the check's configuration
- The parameter descriptions of the check configuration. These are not editable.
-
You can filter the checks by priority by entering Mandatory, Strongly recommended or Recommended.
-
Show only the enabled/disabled checks by searching for Enabled or Disabled.
-
The search is case-insensitive.
-
Show all check configurations by clearing the search bar.
Add new check configurations
In order to be able to add new check configurations to the list, checks that already have an existing configuration can be cloned. To add checks that are not configured yet, click the Add unused checks button to add all unconfigured checks in disabled state.
Checks that have one or more unconfigured parameters are indicated with a warning sign in the checks list. When selected, the unconfigured parameter is indicated as well. After saving the configuration, all parameters are considered to be configured, regardless of whether they were reviewed and changed or not.
Reference configurations
To add a reference to another configuration file, use the options on the Referencing tab shown in the figure below. A custom configuration file can be referenced by browsing to the file, and clicking the Confirm button. A predefined configuration can be referenced by selecting it via the dropdown menu and clicking the Confirm button.
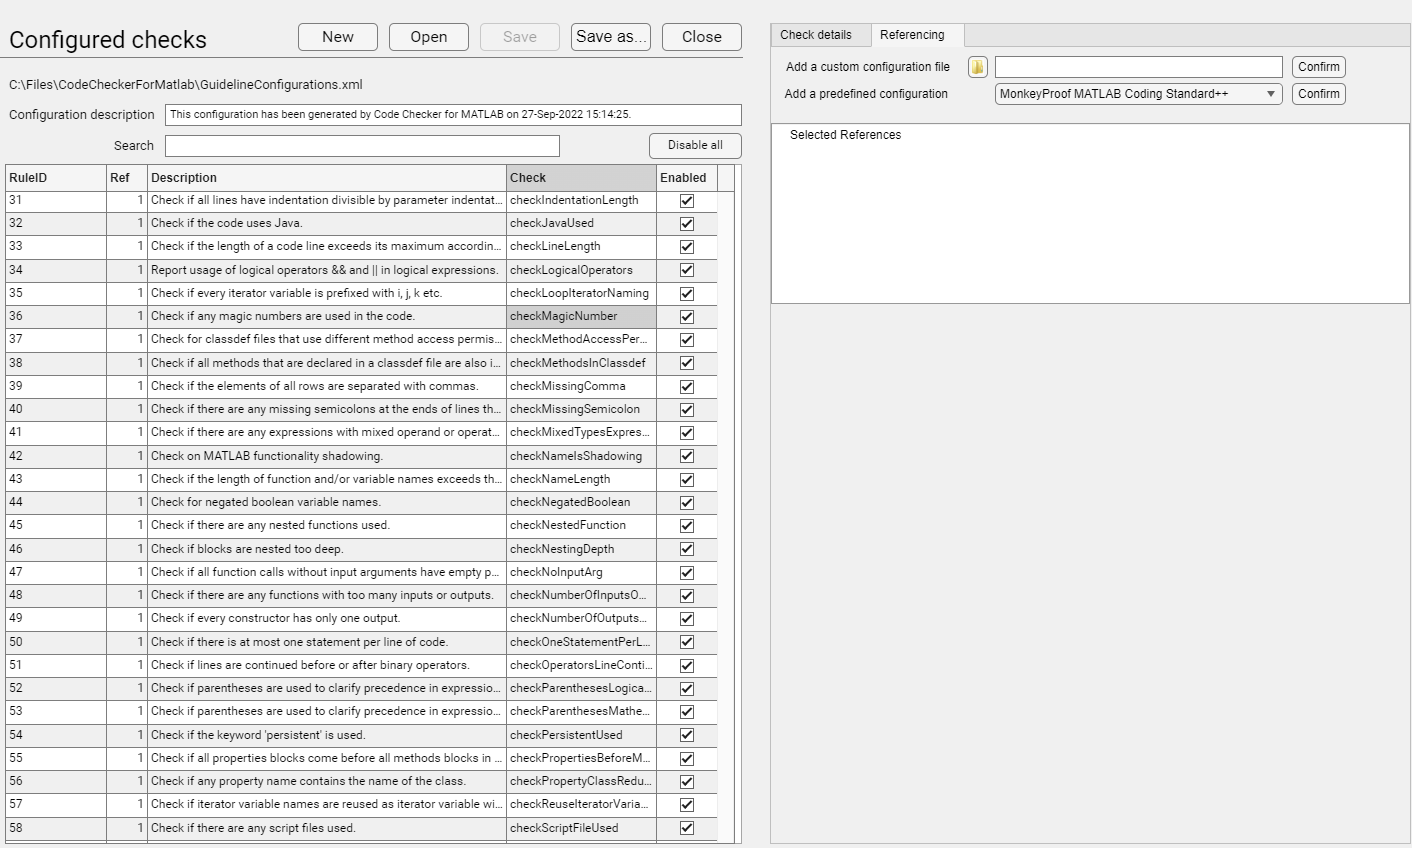
If a custom configuration file or a predefined configuration has been successfully included a confirmation dialog will be shown. The dialog contains information on how many checks have been included. After including a referenced configuration, a tree of the referenced configurations will be shown in the Configuration Editor.
To distinguish between the check configurations that originate from the active configuration
file and the ones that are referenced, all check configurations will
have a Reference number as can be seen in the second column (Ref) of
the list of CC4M checks and reports.
For check configurations that originate from the active configuration file Reference number = 1,
so the first actual reference gets number 2. A visual indication for a check coming from a reference is the link icon  .
When a check overrides a referenced check, the icon changes to a broken link
.
When a check overrides a referenced check, the icon changes to a broken link  and its reference number corresponds to the file that contains the override.