Getting Started
Installation
CC4M is provided as a MATLAB Toolbox CodeCheckerForMATLAB_vxxx.mltbx. To install the toolbox, double click
the add-on installation file in the MATLAB Current Folder browser.
Alternatively, install CC4M from the command window using
matlab.addons.toolbox.installToolbox.
The add-on installation procedure gives no hint on whether the
installation is successful, but you can continue directly after
installing CC4M. The files are installed in the Add-Ons folder that is configured in the Preferences on the MATLAB > Add-Ons tab.
Once CC4M is installed as an add-on in one MATLAB version, it is available in every MATLAB installation on your system that is configured to have add-ons in the selected installation folder.
Prevent Java path issues
CC4M relies on Java functionality. To prevent issues with the Java path, CC4M adds all the Java code to the static javaclasspath. After installing a restart of MATLAB is required.
Online activation
- Once installed run the software by entering
monkeyproof.cc4m.start()at the MATLAB command line. - The first time the software is run (i.e. when no valid license file can be found), the license dialog pops up.
- Enter the license information you received per email:
- Product key
- User name
- Company
Off-line activation
- Once installed run the software by entering
monkeyproof.cc4m.start()at the MATLAB command line. - The first time the software is run (i.e. when no valid license file can be found), the license dialog pops up.
- Press the "Show hardware IDs" button and return these IDs to us by replying to this email.
- We will then provide you with a license file.
- Save this license file to the default license file location (keep the filename intact); when you run the commands below in MATLAB, it will give you the default folder (and create it):
Alternatively, you can save the license file to any convenient location and then set an environment variabletheSettings = settings(); defaultFolder = fullfile(theSettings.matlab.addons.InstallationFolder.ActiveValue, 'Licenses') folderCreated = mkdir(defaultFolder)MONKEYPROOF_LICENSE_FILE_FOLDERto point to the folder containing the license file.- The environment variable can be set at system level (the environment variable will only be visible afterwards in a new MATLAB session).
- If managed from for example a
startup.mwithin MATLAB, add the following code to the startup file (assuming the license file is in the current working directory):setenv('MONKEYPROOF_LICENSE_FILE_FOLDER', pwd)
Connect to a Floating License Server
CC4M reads the location of the Floating License Server from the environment variable MONKEYPROOF_FLOATING_LICENSE_SERVER. The environment variable value shall point to the license server like: "<servername>:<port-id>".
If managed from for example a startup.m within MATLAB, add the following code to the startup file:
setenv("MONKEYPROOF_FLOATING_LICENSE_SERVER", "myserver.mylan:16090")
The use of a Floating License has precedence over a local license file, so in order to use a local license file, make sure the environment variable MONKEYPROOF_FLOATING_LICENSE_SERVER does not exist.
The installation procedure of the Floating License Server is documented below.
Complete and verify installation: check M-code
To verify that the installation is successful, run
monkeyproof.cc4m.start. The following
application should appear after you have activated your license:
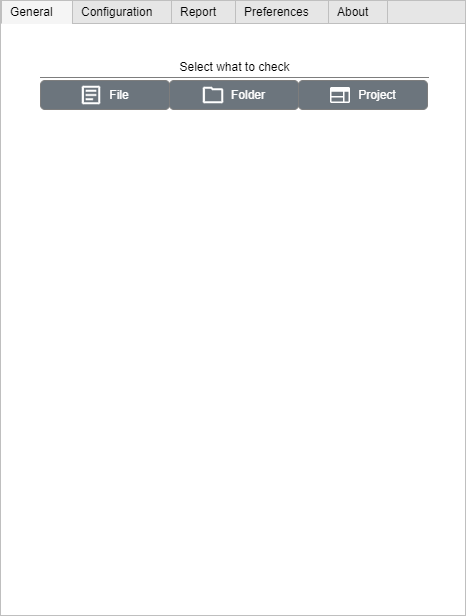
Now you can specify what to check and start the run. The different options are discussed in further detail in section The CC4M user interface.
During the first call, the installation procedure is completed. This includes creating a default configuration - having all checks enabled with default parameter values, priority and severity level. After installation the predefined configuration MonkeyProof MATLAB Coding Standard++ becomes active. For more information on check configurations, see Configuration.
Shortcut to CC4M app
Calling monkeyproof.cc4m.start for the first
time creates a shortcut/favorite in the Quick Access Toolbar. The
shortcut opens the CC4M user interface. It will show up in the top-right
corner of the MATLAB IDE:  .
.
- Prior to MATLAB R2025, CC4M appears in the MATLAB Shortcuts/Favorites Toolstrip as well.
- For MATLAB releases prior to R2018a, the shortcut/favorite is not automatically available on the quick access toolbar. To add the shortcut to the quick access toolbar, edit the shortcut/Favorite and select the "Add to quick access toolbar" option. To add a label to the shortcut, select the "Show label on quick access toolbar" option. For more information see MATLAB R2017b .
Getting help and reporting feedback
For questions, feedback or issues, contact us via support@monkeyproofsolutions.nl . Please add the summary of your question or issue in the post's subject, and put a detailed description, if applicable the steps to reproduce, additional information (at least the CC4M and MATLAB version) and the priority you have with the question/issue in the contents of the post.
In case of errors, please include the full error message and -if possible- also include the file or model that triggers the error when analyzed or checked so that the problem can be reproduced (and fixed).
License Dialog
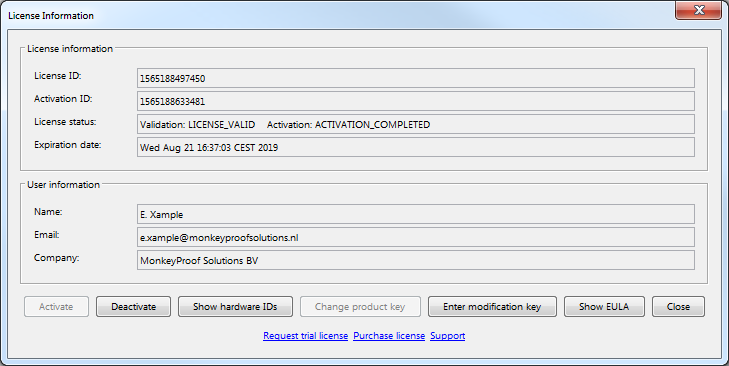
License Information
- License ID The license ID is a unique reference to the license, created when the license was purchased.
- Activation ID The activation is a unique reference to an activation, created when the license was activated.
- License status Shows the current status of the license (validity and activation). If the text in this field is red, either action is required or an error occurred.
- No license The license file has not been found: use the "Change product key" and specify the requested details.
- Validation: LICENSE_VALID Activation: ACTIVATION_REQUIRED The license needs to be activated: use the "Activate" button.
- Other Contact support for assistance.
- Expiration date This is the expiration date of the license.
User Information
- Name Name of the user to which the product is licensed.
- Email Email address used to purchase the license.
- Company Company of the licensee.
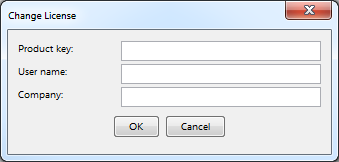
Change Product Key
Specify the product key sent to you by email and the user's name and company as were specified during purchase.
Activate
When the Activate button is clicked, the Activation Dialog appears. It shows the end user license agreement, which needs to be accepted to activate the license.
Deactivate
Deactivates the license to make it available for activation on another machine. The number of allowed deactivations is limited.
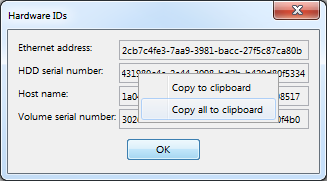
Show Hardware IDs
The Hardware IDs dialogs shows the IDs of a number of properties that can be used for offline activation. The right-click menu offers the option to copy all IDs to the clipboard.
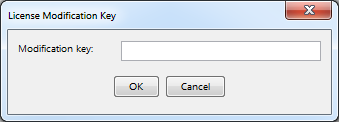
Enter Modification Key
If you receive a license modification key, you can enter it here.
Show EULA
Shows the end user license agreement.
Floating License Server installation and configuration.
CC4M can work with a floating license. For this a Floating Licese Server needs to be installed using the steps below.
After the license server is installed, the CC4M installations need to point to the License Server, which is documented in the section Connect to a Floating License Server.
Install floating license manager
The Floating License Server (FLS) setup includes 2 components; the FLS service and the FLS Management GUI. The FLS service is the actual license server. The hardware ids should refer to this server.
The FLS Management GUI may be installed on the same or separate machine(s). The tool also shows which users have checked out a license.
- FLS Installer download site.
- More on the installation can be found in the installation manual on page 6: License4J User Guide
NOTE: When on Windows running FloatingLicenseServerAdmin.exe fails stating Java version 1.6.0 is required, it is recommended to create a FloatingLicenseServerAdmin.cmd file next to the executable with the following content:
@echo off
set JAVA_HOME=%~dp0\jdk-11
set PATH=%JAVA_HOME%\bin;%PATH%
java.exe -jar FloatingLicenseServerAdmin.jar"
Running this .cmd file makes sure the Java version shipped with the FLS Admin GUI is used.
Get hardware IDs
The hardware IDs related to the FLS service installation need to be obtained in order to receive CC4M a license file. The Display Server Hardware ID menu item in License menu is used to get hardware IDs of floating license server - see page 22 of the License4J User Guide. Send the hardware IDs to MonkeyProof Solutions, in order to receive a license file.
Install license file
After the CC4M license file has been received from MonkeyProof Solutions, it needs to be installed. License file installation is performed with Install New License menu item in the License menu. The selected license file is sent to the server and validated. If the license is valid then it will be installed and a successful installation message is displayed.
More on adding and removing licenses on page 19 of the License4J User Guide